About the addon

Skcrew - A Skript addon, expanding the capabilities of the language.

Addon usage highlights:

  • Working with files and folders
  • Bitwise and logical operations with numbers
  • Sending and creating gui forms through floodgate
  • Simplified creation of in-game GUIs
  • Parsing and executing code from text
  • Drawing on maps
  • Managing player permissions
  • Forcing a player to execute commands with operator permissions
  • InventoryDragEvent and its related expressions
  • Asynchronous/synchronous web requests
  • Retrieving the server’s hardware information
  • Interaction with SQL-like databases
  • Manipulating strings using RegEx (Regular Expression)
  • Retrieving the player’s version via ViaVersion
  • World management: create, upload, copy, delete
  • Proxy communication between servers ( Velocity , BungeeCord )
  • Packet handling: creating, sending, receiving, editing

The English documentation is maintained by GuavaDealer, Contact me if you believe you have found any errors in the documentation.

Contacts

Subsections of About the addon

Chapter 1

Installation

This guide will cover the installation process for Skcrew on your server.

First Steps

The first steps for installing Skcrew on your server.

Compatibility

Skcrew addon compatibility with different server versions and modules.

Configuration

Configuring Skcrew on your server.

Proxy Setup

Setting up Skcrew on a proxy server.

Subsections of Installation

Chapter 1

First Steps

  1. Download the latest version from HERE and move the downloaded file into the plugins/ directory inside the server.

  2. After launching the game or proxy server, the Skcrew directory will be created in the plugins/ directory.

    This directory contains the addon configuration file. In it, you can enable or disable certain modules, as well as adjust some settings, if necessary.

Requirements

Last updated: Skcrew v4.4.2

  • Java 8 or newer
  • PaperMC (spigot might work, but it is not recommended) 1.8.8 or newer
  • Skript 2.6 or newer

No support will be given for SpigotMC Servers , and BungeeCord proxies.
We recommend using PaperMC Servers and Velocity Proxies for the best experience.


Chapter 2

Compatibility

No support will be given for SpigotMC Servers , and BungeeCord proxies.
We recommend using PaperMC Servers and Velocity Proxies for the best experience.

Modules are the core of Skcrew, they provide additional functionality to Skript.
The following table shows which modules are compatible with which server versions.

Module1.8.81.12.21.14+
Bitwise
Files
Floodgate
GUI
Interpret
Maps
Other
Packets
Permissions
Requests
Runtime
Sockets
SQL
String-utils
ViaVersion
World

Certain features of some modules are only available on certain server versions.
The following table shows the compatibility these features:

ModuleFeature1.8.81.12.21.14+
Other Equipment accounted damage

If a feature is not listed in the table, it is compatible with all supported server versions.

A module that is incompatible with your server version will not be loaded, and you will not be able to use it in your scripts.


Chapter 3

Configuration

This guide showcases the default configuration for Skcrew.
The configuration can be changed in the Skcrew directory, inside the config.yml file.

The default configuration for a back-end server ( PaperMC , Spigot , etc.):

advancements:
  enabled: true
bitwise:
  enabled: true
files:
  defaultsync: "async" # default sync type for file operations (async/sync)
  enabled: true
floodgate:
  enabled: true
gui:
  enabled: true
interpret:
  enabled: true
maps:
  enabled: true
other:
  enabled: true
packets:
  enabled: true
permissions:
  enabled: true
requests:
  enabled: true
runtime:
  enabled: true
sockets:
  enabled: false
  server-address: "127.0.0.1"
  server-port: 1337
  client-autoreconnect-time: 5
sql:
  enabled: true
string-utils:
  enabled: true
viaversion:
  enabled: true
world:
  enabled: true

The advancements module is currently not functional.
Do not use it, as it does nothing (for now ).


Default configuration for a proxy server ( Velocity or BungeeCord ):

socket-server-port: 1337

web-server-enabled: true
web-server-port: 1338
web-server-user: admin
web-server-password: admin

Chapter 4

Proxy Setup

This guide provides detailed instructions for installing Skcrew on a proxy server.
The setup utilizes Velocity and PaperMC .
Additionally, the BonfireMC version of the Pterodactyl Panel is used to configure networking.

Please note: The BonfireMC version is not publicly available.
However, the process is essentially the same for the standard Pterodactyl Panel.


PS: This guide is not a complete tutorial on how to set up a proxy network, but rather a guide on how to set up Skcrew on a proxy server.


Setting up Skcrew for networking on a Proxy Server.

Step 1: Install Skcrew on the Proxy Server.

To install Skcrew on the proxy server, follow these steps:

  1. Download the latest version of Skcrew from the Releases section on GitLab.

  2. Move the downloaded file into the plugins/ directory of the proxy server.

  3. Start the proxy server.

Step 2: Allocate ports for Skcrew.

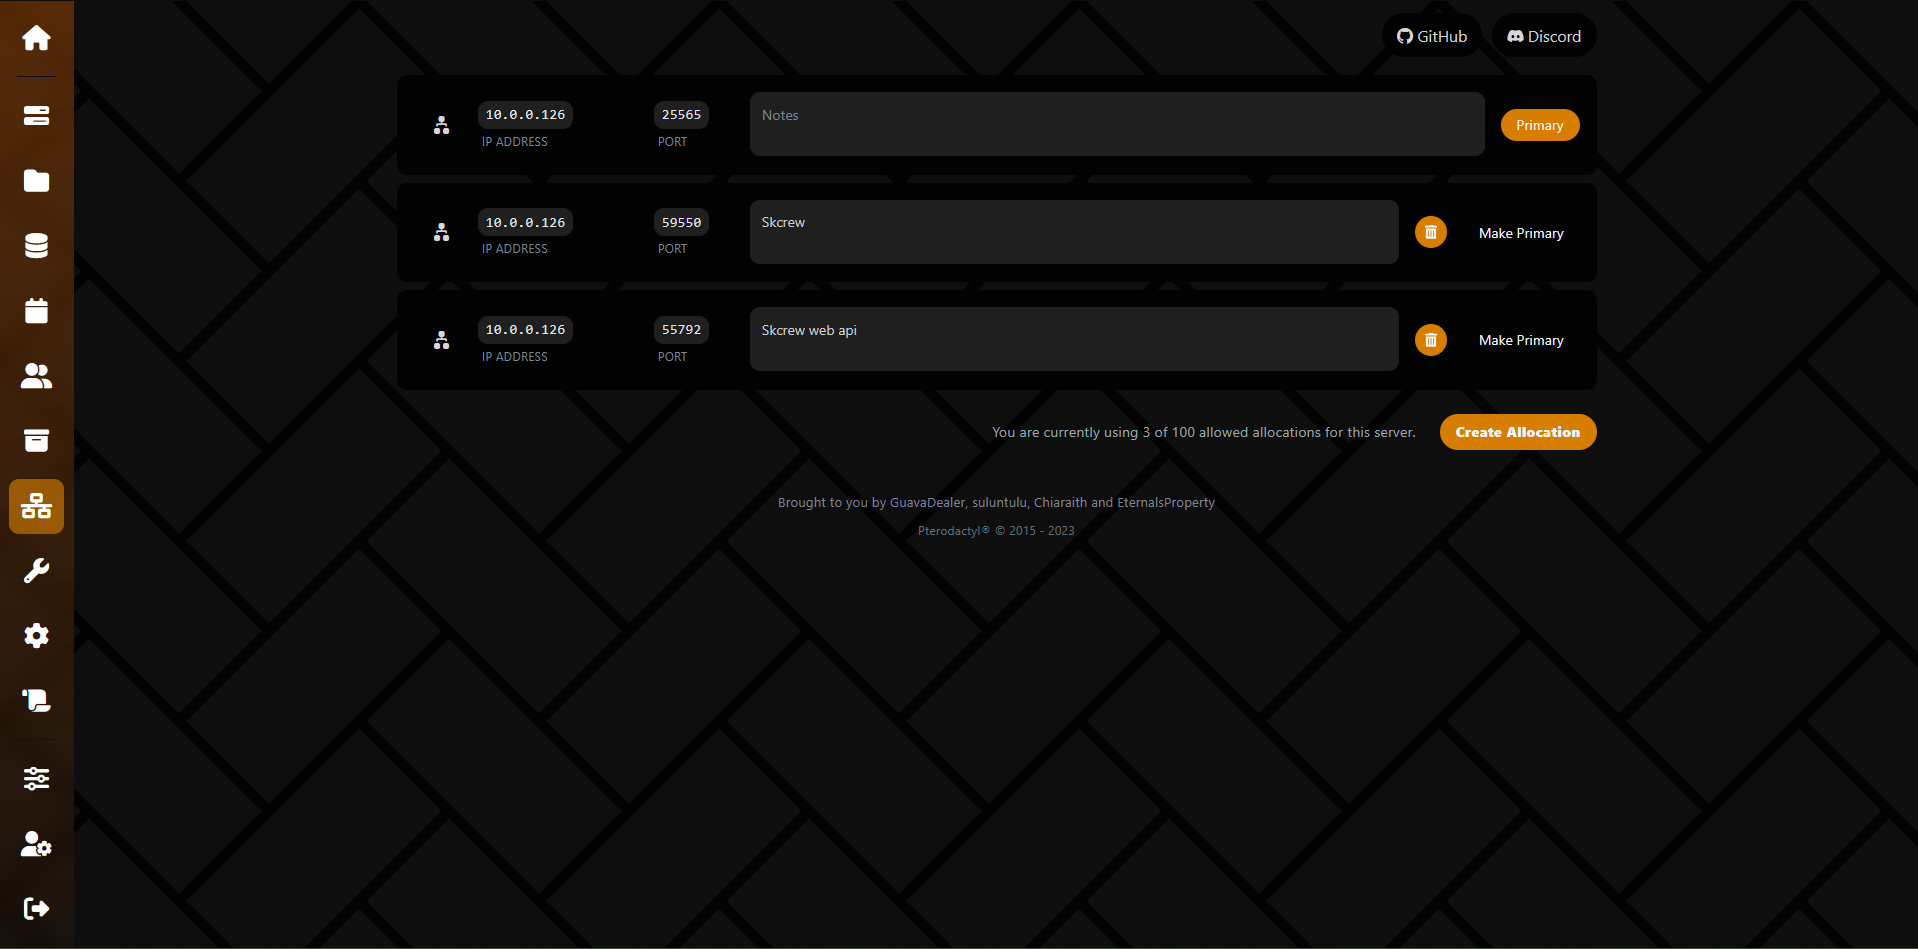
To allocate ports for Skcrew, you will need to head over to the Networking section of the Pterodactyl Panel.
In the Networking section, you can allocate ports for your proxy server.
To do this, follow these steps:

  1. Navigate to the Networking section of the Pterodactyl Panel.
    Looks like this:

    Networking Tab
  1. Click on the Create Allocation button (Twice).
    Creating Port Allocations

    Optionally, you can give them a name, such as Skcrew and Skcrew web api or something similar.

  1. Copy the allocated ports to your clipboard.
    In this case, the ports are 59550 and 55792.
    We will need these ports in the next step.

Step 3: Configure Skcrew on the Proxy Server.

  1. Open the Skcrew configuration file.
    This file is located in the Skcrew directory inside the plugins/ directory of the proxy server.
  1. Set the socket-server-port to the first allocated port (in this case, 59550).
    This is the port that Skcrew will use to communicate with the proxy server.
  1. Set the web-server-enabled to true.
    This will enable the web server for Skcrew, allowing you to access the Skcrew web API.
  1. Set the web-server-port to the second allocated port (in this case, 55792).
    This is the port that the web server will listen on.
  1. Set the web-server-user and web-server-password to your desired values.
    These will be used to authenticate requests to the Skcrew web API.
  1. Review the configuration file and save it.
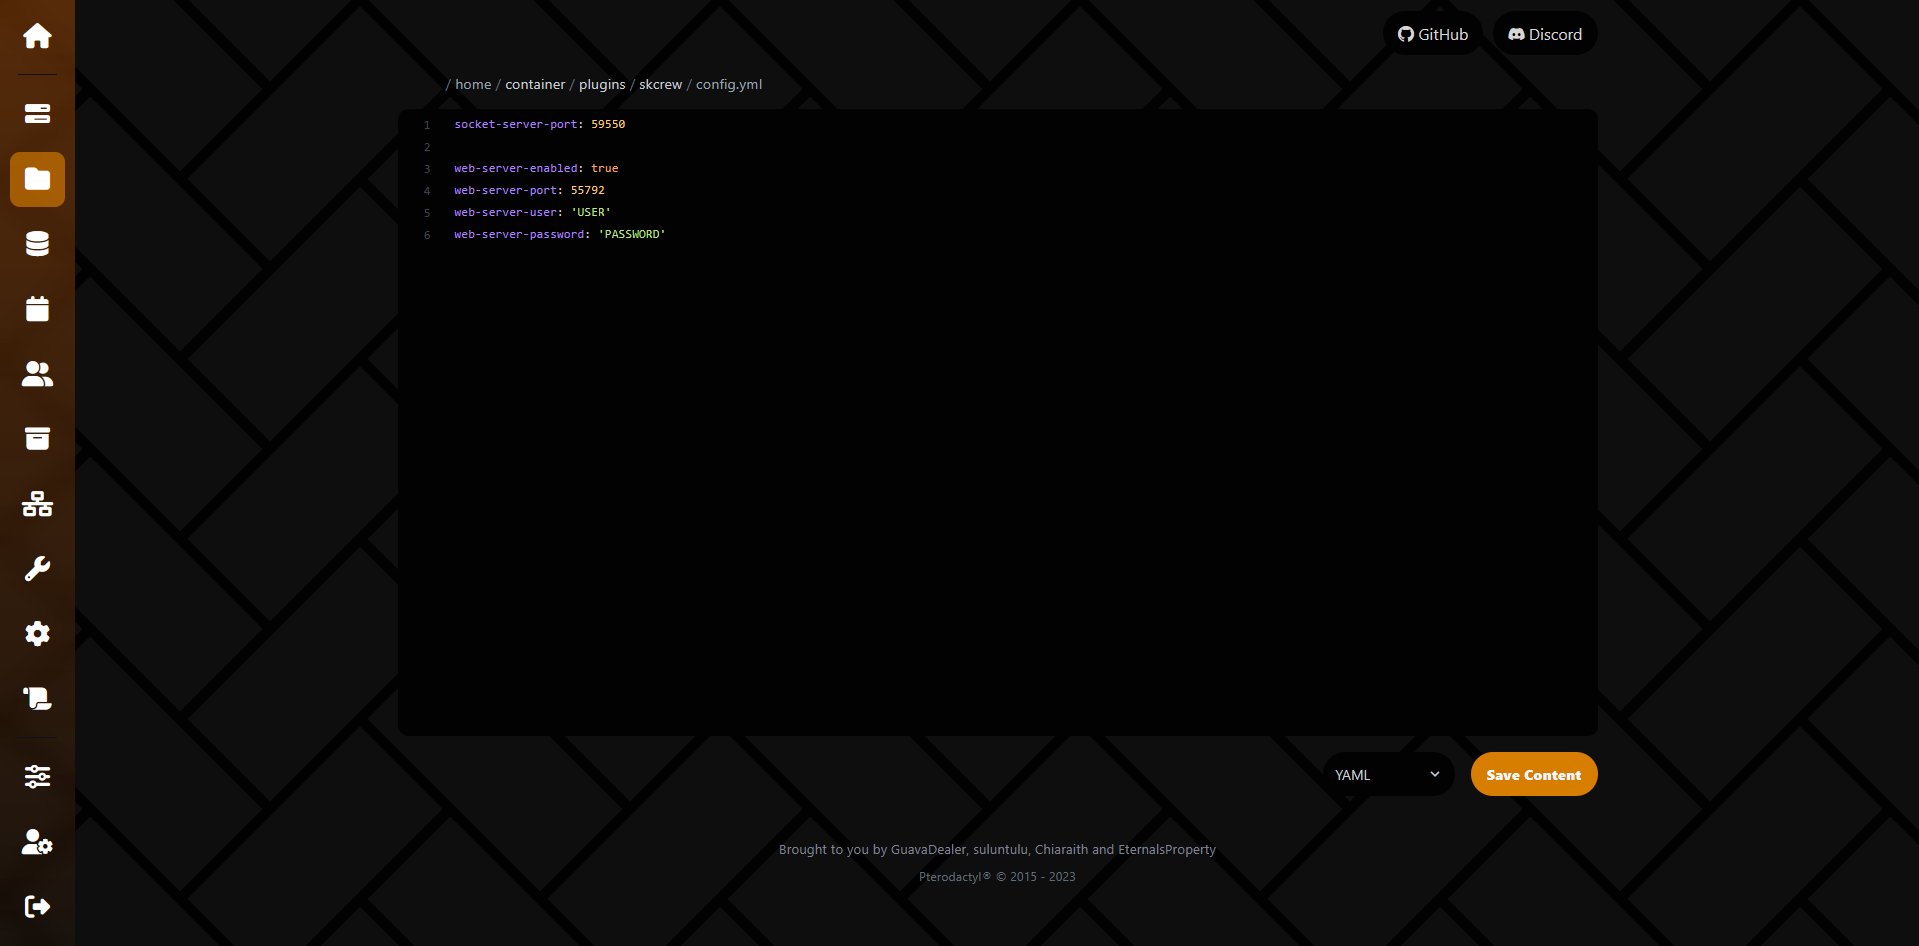
    Our final configuration file should look like this:

    Final Proxy Server Configuration
    socket-server-port: 59550
    
    web-server-enabled: true
    web-server-port: 55792
    web-server-user: "USER"
    web-server-password: "PASSWORD"
  2. Restart the proxy server to apply the changes.

And that’s it! Skcrew is now set up on your proxy server.

Setting up Skcrew for networking on a Back-end Server.

Step 1: Install Skcrew on the Back-end Server.

  1. Download the latest version of Skcrew from the Releases section on GitLab.
  1. Move the downloaded file into the plugins/ directory of the back-end server.
  1. Start the back-end server.

Step 2: Configure Skcrew on the Back-end Server.

  1. Open the Skcrew configuration file.
    This file is located in the Skcrew directory inside the plugins/ directory of the back-end server.
  1. Set the sockets.enabled to true.
    This will enable the sockets module for Skcrew, allowing it to communicate with the proxy server.
  1. Set the sockets.server-address to the IP address of the proxy server.
    This is the address that the back-end server will use to connect to the proxy server.
    Can be both an IPv4 or a domain name.
  1. Set the sockets.server-port to the port that the proxy server is listening on.
    This is the port that the back-end server will use to connect to the proxy server.
  1. Set the sockets.client-autoreconnect-time to the desired value (in seconds).
    This is the time that Skcrew will wait before trying to reconnect to the proxy server if the connection is lost.
  1. Review the configuration file and save it.
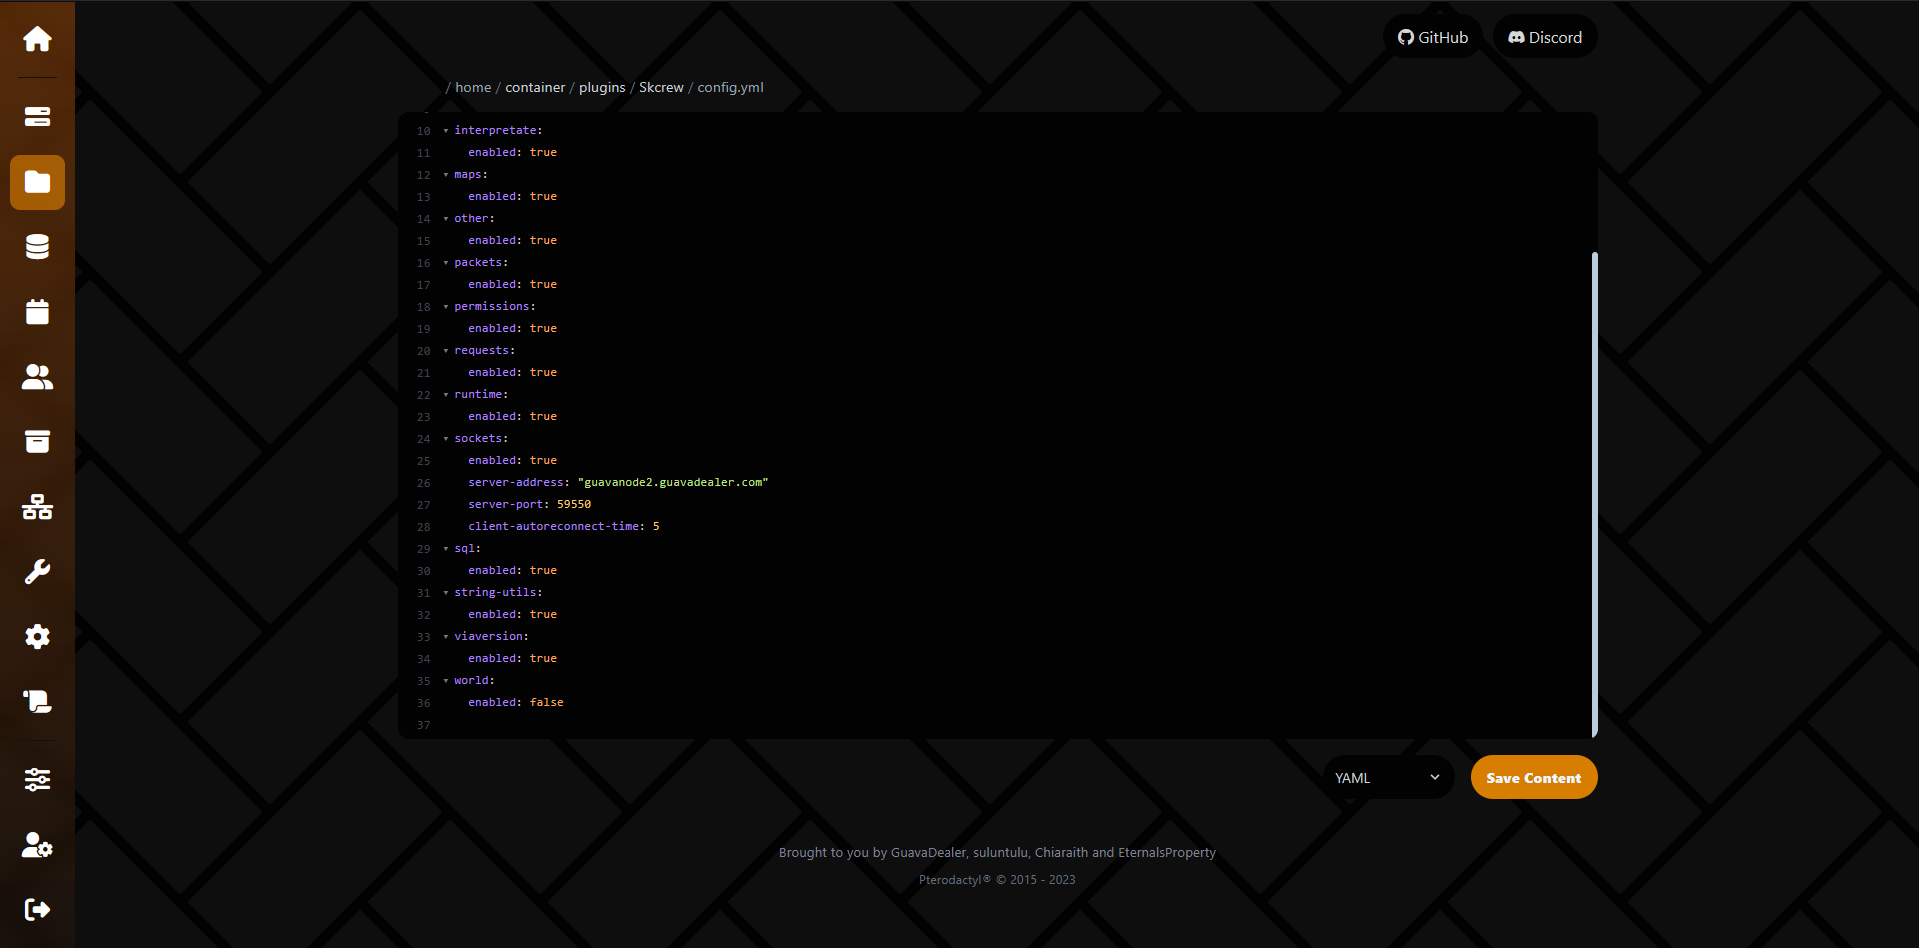
    Our final configuration file should look like this:

    Final Back-end Server Configuration
    sockets:
      enabled: true
      server-address: "PROXY_SERVER_IP"
      server-port: 59550
      client-autoreconnect-time: 5
  2. Restart the back-end server to apply the changes.

And that’s it! Skcrew is now set up on your back-end server and is ready to communicate with the proxy server.


Bitwise

This module allows you to perform logical and bitwise operations with numbers.

Files

This module allows you to perform operations with files.

Floodgate

Interact with the Floodgate plugin to get information about Bedrock players.

GUI

Create interactive GUIs in a few lines of code.

Interpret

Execute code from a string or independent lines of code.

Maps

Create and manipulate maps.

Packets

Modules related to packet processing and analysis.

Permissions

Learn how to manage player permissions in Skript, including executing commands with operator rights and modifying player permissions programmatically.

Requests

Requests module for managing and processing requests in the system.

Runtime

This module allows you to get information about the load and some technical information about the system.

Sockets

This module allows servers under the control of a proxy server to exchange information via sockets.

SQL

This module allows you to connect to the DBMS and make synchronous and/or asynchronous requests.

String utils

This module allows you to work with strings.

ViaVersion

Allows you to interact with the ViaVersion plugin.

World

World management.

Other

Other modules that don't fit into the other categories.

Subsections of Modules

BITWISE

This module allows you to perform logical and bitwise operations with numbers.

Special thanks to Pesekjak for creating the Bitshift addon. The implementation of binary operations and the concept of bitwise shifts were inspired by their work.

Binary operation OR

Copies a bit to the result if it exists in both operands.

%number% | %number%

Logical operation OR

If at least one is True, then the truth will be returned.

%boolean% || %boolean%

Binary operation AND

Copies a bit if it exists in any of the operands.

%number% & %number%

Logical operation AND

If both operands are True, then true will be returned.

%boolean% && %boolean%

Binary operation XOR

Copies a bit if it is set in one operand, but not in both.

%number% ^^ %number%

Bitwise shift to the left

The value of the left operands moves to the left by the number of bits specified by the right operand.

%number% << %number%

Bitwise shift to the right

The value of the right operands moves to the right by the number of bits specified by the left operand.

%number% >> %number%

Bitwise zero shift to the right

The value of the left operands is moved to the right by the number of bits specified by the right operand, and the shifted values are filled with zeros.

%number% >>> %number%

Binary complement operation (reflection)

Each bit of the number will be inverted.

~%number%

A number in binary notation

0(b|B)<[0-1]+>
set {_binary} to 0b22

A number in the hexadecimal system

0(x|X)<[A-Fa-f0-9]+>
set {_hexadecimal} to 0xFF

Subsections of Files

EVENTS

File change event

[on] (file|dir[ectory]) creation[s] (at|for) [[the] (file[s]|dir[ector(y|ies)]|paths)] %strings%
[on] (file|dir[ectory]) modify[ication][s] (at|for) [[the] (file[s]|dir[ector(y|ies)]|paths)] %strings%
[on] (file|dir[ectory]) deletion[s] (at|for) [[the] (file[s]|dir[ector(y|ies)]|paths)] %strings%
[on] (file|dir[ectory]) overflow[s] (at|for) [[the] (file[s]|dir[ector(y|ies)]|paths)] %strings%
[on] every (file|dir[ectory]) change[s] (at|for) [[the] (file[s]|dir[ector(y|ies)]|paths)] %strings%

EXPRESSIONS

You get either a real file, if there is one, or an abstract file that can then be created.

[the] (file[s]|dir[ector(y|ies)]) [path] %strings%
set {_file} to file "eula.txt"

Get an absolute path

Absolute means the path starts from the root of the file system.

absolute path of %path%
%path%'s absolute path
set {_file} to absolute path of file "eula.txt"

Get all files inside a directory

You can do this recursively, getting files in the directory and all internal directories.

[all] files in %path%
loop all files in dir "plugins/":
  broadcast "%loop-value%"

Get the text content of a file

Can be changed.

content[s] of %path%
%path%'s content[s]
set {_file} to content of file "eula.txt"
replace all "false" with "true" in {_file}
set content of file "eula.txt" to {_file}

Get the name of a file or directory

Can be changed.

name of %path%
%path%'s name
loop all files in dir "plugins/":
  broadcast name of file loop-value

Read a line or lines of a file, or change them

[the] line %number% (from|of|in) %path%
[all] [the] lines (from|of|in) %path%
set line 1 of file "eula.txt" to "eula=true"

Get the directory where the file or folder is located

Can be changed.

parent of %path%
%path%'s parent
set {_file} to parent of file "eula.txt"

Get file size in bytes

size of %path%
%path%'s size

Get the last access date of a file

last access time of %path%
%path%'s last access time

Get the last modified date of a file

last modified time of %path%
%path%'s last modified time

Get file creation date

creation time of %path%
%path%'s creation time

Get file extension

extension of %path%
%path%'s extension

Disk space info

total space of %path%
usable space of %path%

CONDITIONS

Checking if a path exists

%path% (is|does)[(n't| not)] exist[s]
if file "eula.txt" exists:
  broadcast "eula.txt does exist"

Checking if a path is a directory

%path% is[(n't| not)] directory
if file "eula.txt" is not directory:
  broadcast "eula.txt is not a directory"

Checking if a path is a file

%path% is[(n't| not)] [a] file
if file "eula.txt" is file:
  broadcast "eula.txt is a file"

Checking if a path is empty

%path% is[(n't| not)] empty

Checking if a path is executable

%path% is[(n't| not)] executable

Checking if a path is hidden

%path% is[(n't| not)] hidden

Checking if a path is readable

%path% is[(n't| not)] readable

Checking if a path is a system file

%path% is[(n't| not)] [a] system file

Checking if a path is writable

%path% is[(n't| not)] writable

EFFECTS

Copy a file or directory

It also allows you to specify a parameter for overwriting if the file already exists

copy %path% to %path%
copy file "plugins/Skcrew.jar" to file "./"

Create a simple file

It also allows you to specify the text content of the file being created

[(async/sync)] create %path% [with content %strings%]
create file "eula.txt" with content "eula=true"

Delete a file or directory

[(async/sync)] delete %path%
delete file "plugins/Skript-2.11.1.jar"

Move a file or directory

[(async/sync)] move %paths% to %path%
move file "plugins" to file "disabled_plugins"

Rename a file or directory

[(async/sync)] rename %path% to %string%
rename file "plugins/Skript/scripts/mycoolscript.sk" to "-mycoolscript.sk"

Unpack the zip archive

[(async/sync)] unzip %path% to %path%
unzip file "myarchive.zip" to file "./"

Create a zip archive

[(async/sync)] zip %path% to %path%
zip file "world/" to file "backupworld.zip"

Download a file

[(async/sync)] download file from [url] %string% (and store it in|to) %path%
async download file from "https://github.com/SkriptLang/Skript/releases/download/2.11.1/Skript-2.11.1.jar" to "plugins/Skript-2.11.1-FILE.jar"

The code in this example will download Skript 2.11.1 to the /plugins/ directory with Skript-2.11.1-FILE.jar as the name of the file.

FLOODGATE

This module allows you to interact with the Floodgate plugin.

The Floodgate plugin is required for this module to work

Check if a player has logged in through Bedrock Edition

%player% [(is|does)](n't| not) from floodgate

Get the localization of the player

[the] be[[drock] [edition]] (locale|language) of [the] [floodgate] %player%
%player%'s be[[drock] [edition]] (locale|language) [of [the] floodgate]

Get the name of the player’s device

[the] [be[[drock] [edition]]] (platform|device) of [the] [floodgate] %player%
%player%'s [be[[drock] [edition]]] (platform|device) [of [the] floodgate]

Get the Bedrock version of the client

[the] be[[drock] [edition]] version of [the] [floodgate] %player%
%player%'s be[[drock] [edition]] version [of [the] floodgate]

Subsections of Floodgate

FORM TYPES

Creating a new form

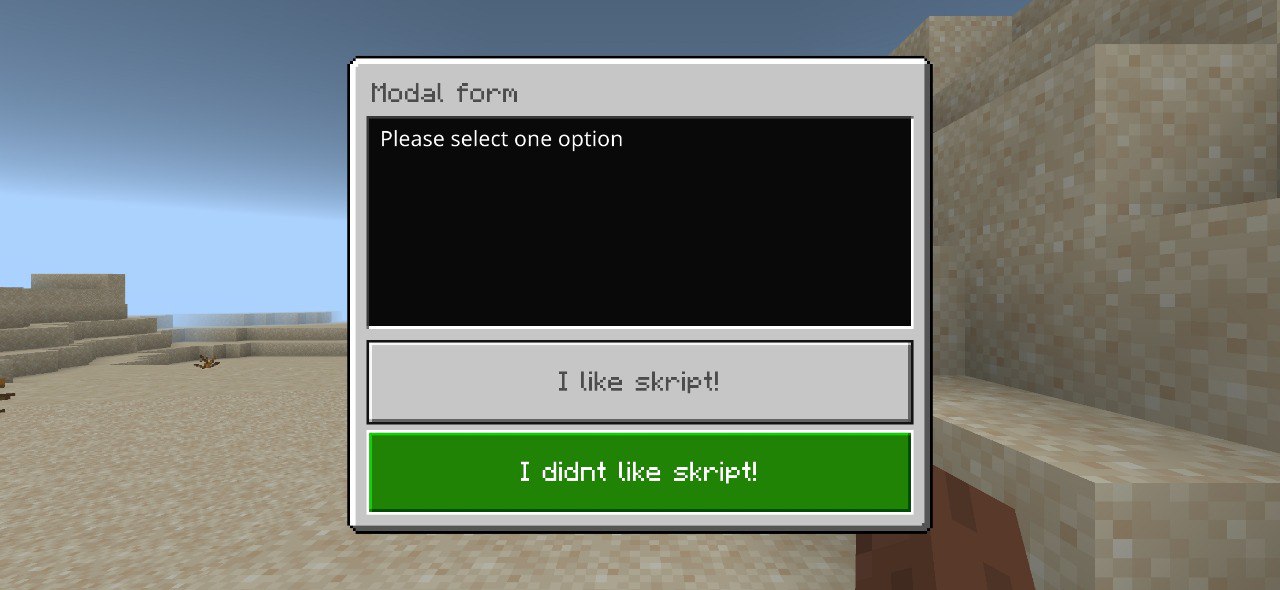
It is the simplest form, which has only two buttons and a description block. The buttons are a conditional choice of ‘yes’ or ’no’.
The created form will be placed in the expression last created form

create [a] [new] modal form (with (name|title)|named) %string%
command /modalform:
    trigger:
      create modal form named "Modal form":
        set form content to "Please select one option"
        run on form close:
            broadcast "closed"
        run on form open:
            broadcast "opened"
        form button named "I like skript!":
            broadcast "Thank you!!!"
        form button named "I didnt like skript!":
            broadcast "USE DENIZEN INSTEAD!!!"
            broadcast "Just kidding, skript is the best"
            broadcast "If you use denizen, you are just wasting your time"
      open last created form to player

modal form
modal form

Simple form

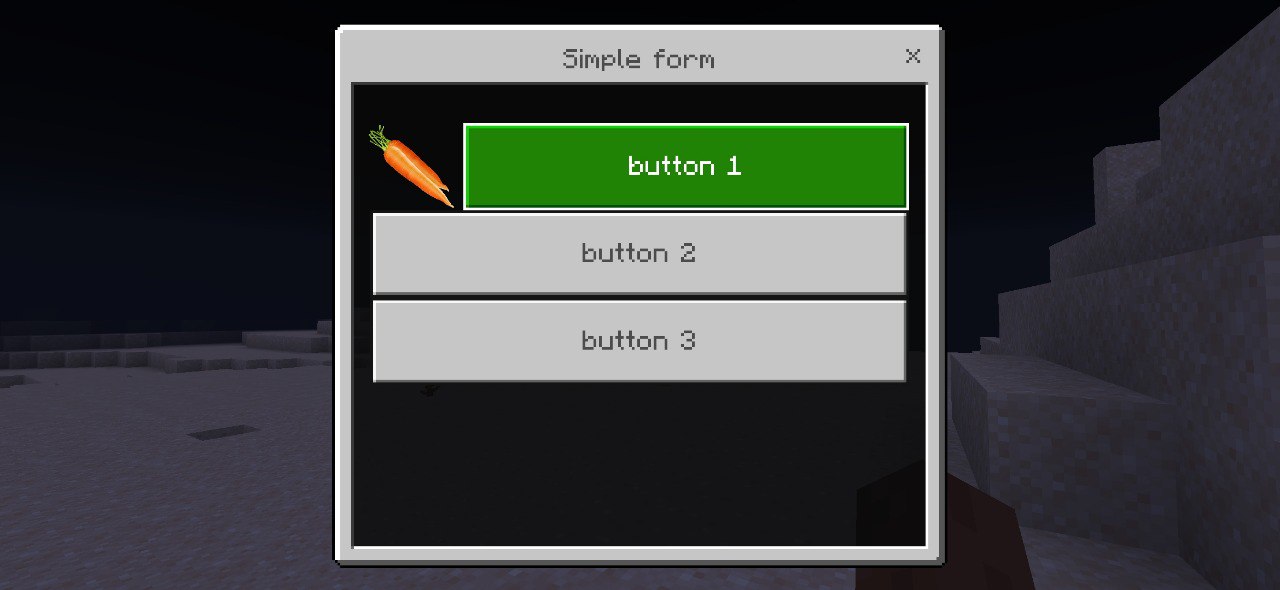
It is a form with buttons. There can be an unlimited number of buttons, in addition, the buttons can have images from the Internet.
The created form will be placed in the expression last created form

create [a] [new] simple form (with (name|title)|named) %string%
command /simpleform:
    trigger:
        create simple form named "Simple form":
            form button named "button 1" with image "https://pics.clipartpng.com/Carrots_PNG_Clipart-465.png":
                broadcast "button 1 pressed"
            form button named "button 2":
                broadcast "button 2 pressed"
            form button named "button 3":
                broadcast "button 3 pressed"
        open last created form to player

simple form
simple form

Custom form

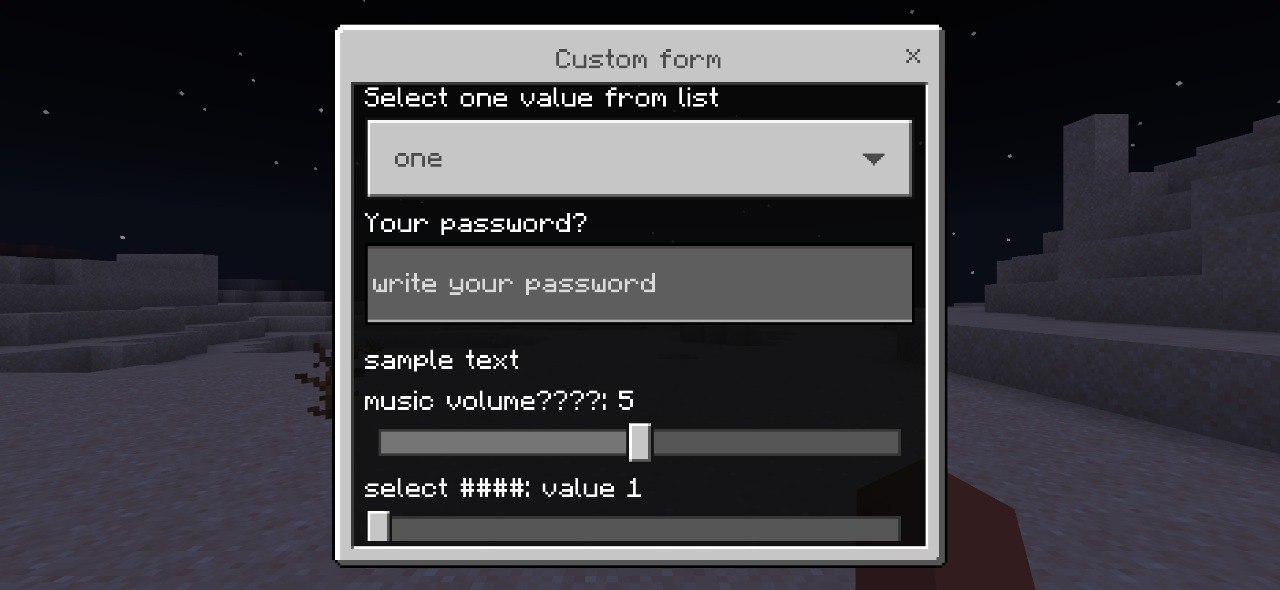
It is a form with any elements except buttons. This type of forms allows you to use sliders, switches, input fields, selection fields, etc.
The processing of the form elements is carried out in the section on form result
The created form will be placed in the expression last created form

create [a] [new] custom form (with (name|title)|named) %string%
command /customform:
  trigger:
    create custom form named "Custom form":
      form dropdown named "Select one value from list" with elements "one", "two", "three"
      form input named "Your password?" with placeholder "write your password"
      form label named "sample text"
      form slider named "music volume????" with minimum value 0 and maximum value 10
      form textslider named "select shit" with elements "value 1","value 2","value 3"
      form toggle named "yes or no?"
      run on form result:
        broadcast "%form toggle 1 value%"
        broadcast "%form dropdown 1 value%"
        broadcast "%form input 1 value%"
        broadcast "%form label 1 value%"
        broadcast "%form slider 1 value%"
        broadcast "%form textslider 1 value%"

    open last created form to player

custom form
custom form

Last created form

[the] (last[ly] [(created|edited)]|(created|edited)) form

Open the form to the player

open %form% (for|to) %players%

FORM ELEMENTS

Buttons

The button is a section, the code inside of which will be executed when you click on it.
After clicking on the button, the form will be automatically closed (a feature of Bedrock forms).

Can only be used in Modal form and Simple form because these forms support button interactions.
Using buttons in other forms may result in unexpected behavior or errors.
The button with the image can only be used in Simple form

form(-| )button ((with (name|title))|named) %string% [with image %string%]
command /modalform:
  trigger:
    create modal form named "Modal form":
      form button named "My button":
        broadcast "Pressed button"

    open last created form to player

Description of Modal form.

The Modal form allows you to specify or retrieve a text description that provides context or instructions to the user.
This description can be set during the creation of the form or modified later in an already created form.
It is particularly useful for guiding users through the form’s purpose or actions they need to take.
For more details, refer to the creation section Modal form .

form['s] content
content of form
%form%['s] content
content of %form%
command /modalform:
  trigger:
    create modal form named "Modal form":
      set content of form to "Sample text"
    open last created form to player

Custom form Elements

The values of Custom form Elements can only be retrieved in the run on form result section after the form is closed.

User Input element

Creates an element in which the user can enter any text.
Allows you to specify the initial text inside the field, and the placeholder text.

form(-| )input (with name|named) [%string% (with|and) [placeholder] %string%[(, | (with|and) ) [def[ault] [value]] %string%]]
Choosing from the list

Creates an element in which the user can select one of the suggested values. Allows you to specify the initial value by index.

form(-| )drop[(-| )]down (with name|named) %string% (with|and) [elements] %strings%[(, | (with|and) ) [def[ault] [(element [index]|index)]] %number%]
Label, note, text

Creates an element with text.

form(-| )label [(with (name|title)|named)] %string%
A slider with a numeric value selection

Creates an element in the form of a strip with a control in which the user can specify a value. Allows you to specify the minimum and maximum threshold of numbers, the initial value and the slider step.

form(-| )slider (with name|named) %string% [[(with|and) [min[imum] [value]] %number%[(, | (with|and) ) [max[imum] [value]] %number%[(, | (with|and) ) [def[ault] [value]] %number%[(, | (with|and) ) [[step] [value]] %number%]]]]
A slider with a selection of values

Creates an element similar to the numeric slider, but with text values. Allows you to specify the initial value by index.

form(-| )(text|step)[(-| )]slider (with name|named) %string% (with|and) [elements] %strings%[(, | (with|and) ) [def[ault] [(element [index]|index)]] %number%]
command /textsliderform:
    trigger:
        create custom form named "Text Slider Form":
          form textslider named "Choose an option" with elements "Option 1", "Option 2", "Option 3", "Option 4" with default element index 2

        open last created form to player
The switch element.

It has only two states, on or off.
You can specify the initial state.

form(-| )toggle (with name|named) %string% [(with|and) [def[ault]] [value] %boolean%]

Processing the results

Get the player inside the form

Use this expression to get the player interacting with the form. For example, instead of using a variable like %player% to refer to the player, you can directly use this expression to ensure it references the player inside the form.

form(-| )player

Getting the type of the created form

form[(-| )]type of %form%
%form%'s form[(-| )]type

Available types of forms for comparison:

  • custom form
  • modal form
  • simple form

Execute the code when opening/closing the form

run (when|while) (open[ing]|clos(e|ing)) [[the] form]
run (when|while) [the] form (opens|closes)
run on form (open[ing]|clos(e|ing))
create modal form named "Modal form":
  run on form close:
    broadcast "%formplayer%" #will show the name of the player who closed the form
open last created form to player

Disable or allow closing of the form

By default, closing the form is allowed. If closing is disabled, the form will reopen after a selection is made.

cancel [the] form clos(e|ing)
uncancel [the] form clos(e|ing)

Get the reason for closing the form

This expression can only be used in the section on executing code when closing the form

[form(-| )]close reason

Available reasons for closing for comparison:

  • close
  • (submit|success)
  • invalid[ response]

Execute the code on form submit

run on form (result|submit)
create custom form named "Custom form":
  form toggle named "toggle value"
  run on form result:
    broadcast "%form toggle 1 value%"
open last created form to player

Custom form elements

This expression can only be used in the section on executing code on form submission

[form[(-| )]](drop[(-| )]down|input|slider|step[(-| )]slider|toggle) %number% [value]
value of [form[(-| )]](drop[(-| )]down|input|slider|step[(-| )]slider|toggle) %number%

For button processing Modal form and Simple form use the section on creating buttons

Subsections of GUI

Creating a GUI

Creating a new GUI

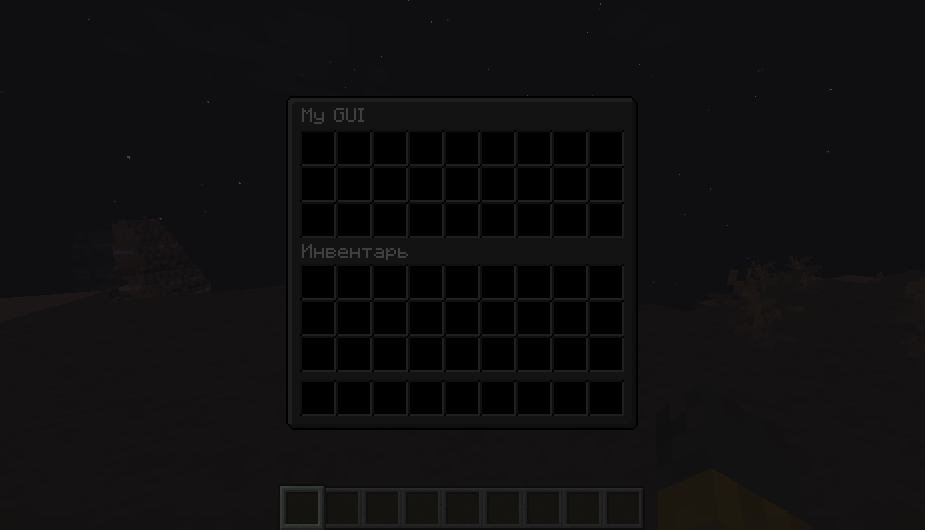
Creates a new GUI and puts it in the result of the expression last created GUI

create [a] [new] gui with %inventory% [(and|with) ([re]move[e]able|stealable) items] [(and|with) shape %strings%]
create a gui with chest inventory with 3 rows named "My GUI":
  make all gui slots with air
open last created gui to player

empty gui
empty gui

The final argument lets you use templates to define the arrangement of interactive elements in your GUI.
These templates are strings, where each character represents a slot in the inventory:

  • "x" marks a slot to be filled with a specific element.
  • "-" leaves the slot empty.

For example, using the template "xxixx" with a funnel inventory will fill the first, second, fourth, and fifth slots with the element for "x", and the third slot with the element for "i".
This gives you detailed control over your GUI’s layout.

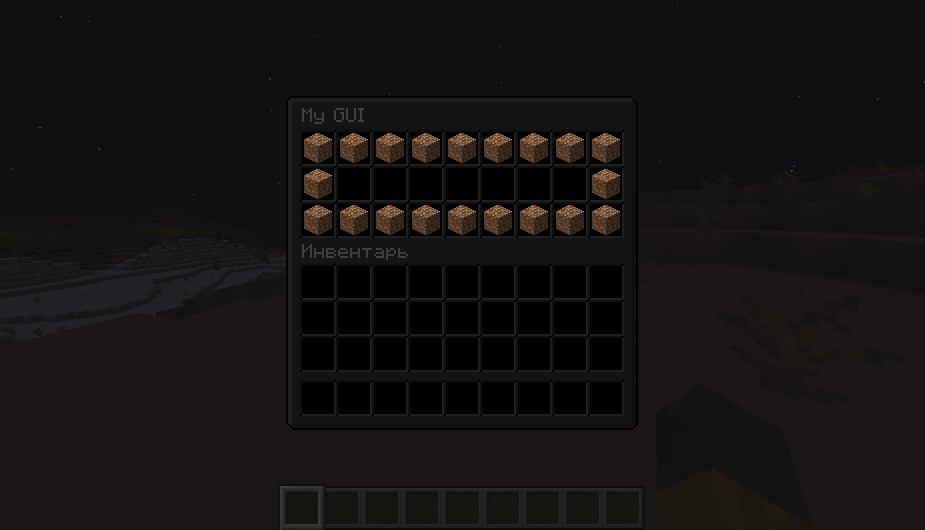
create a gui with chest inventory with 3 rows named "My GUI" with shape "xxxxxxxxx","x-------x","xxxxxxxxx":
  make gui slot "x" with dirt
open last created gui to player
Explanation:

Each string in the shape corresponds to a row in the GUI, and each character in the string represents a slot.

For example, “x” marks a slot to be filled with the specified element, while “-” leaves the slot empty.

In this case:

Row 1: All slots are filled (“xxxxxxxxx”).

Row 2: Only the first and last slots are filled (“x——-x”).

Row 3: All slots are filled again (“xxxxxxxxx”).

After creating the GUI, open last created gui to player displays the most recently created GUI to the player.

Finally, this will result in the following GUI:

gui shape
gui shape

Tutorial written by @GuavaDealer

Edit an already created GUI

Allows you to redefine interactive elements inside an already created GUI, including modifying existing elements, changing the layout, or adding new ones. When you click on an interactive GUI element (e.g., a slot in the GUI), the code inside the section will be executed. For example, clicking on a slot with a stone item could broadcast a message or perform an action. Here’s an example: The expression below creates an interactive element on the next empty inventory slot, which refers to the first available slot in the inventory that is not occupied by any item. For example, if slots 1, 2, and 3 are filled, the next empty inventory slot would be slot 4.

(change|edit) [gui] %gui%

Create an interactive element

Clicking this element triggers the execution of the code within its section. The expression below creates an interactive element on the next empty inventory slot.

(make|format) [the] next gui [slot] (with|to) [([re]mov[e]able|stealable)] %itemtype%

The following expression allows you to specify the value from the template or the slot number to create the element.

(make|format) gui [slot[s]] %strings/numbers% (with|to) [([re]mov[e]able|stealable)] %itemtype%
create a gui with chest inventory with 3 rows named "My GUI":
  make gui slot 1 with stone named "Click for hello world!":
    broadcast "Hello world!"

Delete an interactive element

(un(make|format)|remove) [the] next gui [slot]
(un(make|format)|remove) gui [slot[s]] %strings/numbers%
(un(make|format)|remove) all [[of] the] gui [slots]

When opening the GUI

The code inside this section will be executed after opening the GUI to the player.

run (when|while) open[ing] [[the] gui]
run (when|while) [the] gui opens
run on gui open[ing]

On gui close

The code inside this section will be executed after the GUI is closed by the player.

run (when|while) clos(e|ing) [[the] gui]
run (when|while) [the] gui closes
run on gui clos(e|ing)

Last created GUI

Returns the most recently created or edited GUI, depending on the context of the operation.

[the] last[ly] [(created|edited)] gui

Processing the results

The player’s open GUI

Returns the player’s currently open GUI.
If the player does not have a GUI open, it will return <none>.

%players%'s gui
gui of %player%'s

Check whether any GUI is open or not for the player

%players% (has|have) a gui [open]
%players% do[es](n't| not) have a gui [open]

The next GUI slot

Returns the number or letter of the template of the next GUI slot

%guis%'[s] next gui slot[s]
[the] next gui slot[s] of %guis%

Subsequent expressions can only be used in the GUI creation sections and creating an interactive element

[the] next gui slot

The name GUI inventory

%gui%'s gui(-| )name
gui(-| )name of %gui%

GUI Inventory Size

%gui%'s gui(-| )size
gui(-| )size of %gui%

GUI Template

%gui%'s gui(-| )shape
gui(-| )shape of %gui%

The ability to take items in the GUI

%gui%'s gui(-| )lock(-| )status
gui(-| )lock(-| )status of %gui%

Current, editable GUI

[the] gui

Clicked Slot

[the] gui(-| )raw(-| )slot

The hotkey of the clicked slot

[the] gui(-| )hotbar(-| )slot

GUI inventory that is being edited

[the] gui(-| )inventory

Action inside the GUI

For example, a player made a double click, which caused things to gather in the cursor slot.

[the] gui(-| )inventory(-| )action

Type of click

For example, a player made a click with the Shift key held down.

[the] gui(-| )click(-| )(type|action)

Cursor slot

[the] gui(-| )cursor[(-| )item]

The type of clicked slot

[the] gui(-| )slot(-| )type

The clicked item

[the] gui[(-| )(clicked|current)](-| )item

The expression used instead of the player inside the GUI section

[the] gui(-| )player

Be sure to use this expression inside the GUI or interactive element creation section instead of player, otherwise your code will not work as you expect it to.
Using player outside these sections may result in referencing the wrong player or causing unexpected behavior in your GUI logic.

Players who have a GUI open

[the] gui(-| )(viewer|player)s

ID of the clicked slot

[the] gui(-| )slot(-| )id

Subsequent expressions can only be used in the closing GUI section

Cancel the closure

Prevents the player from closing the GUI by automatically reopening it, preserving the GUI’s parameters

cancel [the] gui clos(e|ing)

Allow closure

Allows the player to close the GUI

uncancel [the] gui close(e|ing)

Interpret

Execute code from a string

Enables the execution of multiple lines of code provided in text format.

evalnode %strings%
evalnode "if 1 is 1:","  broadcast ""1 is in fact 1"""

Broadcasts 1 is in fact 1

Execute independent lines of code

Allows you to execute individual lines of code efficiently (executes faster but offers limited functionality)

eval[uate] %strings%
evaluate "broadcast ""yes"""

Subsections of Maps

Creating a map

Creating a canvas

Returns a canvas object that can be used to create and manipulate a map, which can later be retrieved as a game map object.

[new|empty] drawing map

When creating a map in a folder /skcrew/maps/, a map image file will be created. The file name will match the ID of the game map.

Getting a canvas by map ID

[drawing] map (by|with) id %number%

Getting an item from the canvas

Accepts a canvas object as an argument, which represents a drawable map surface, and returns a game map item that can be used in the game.

[the] map item (from|of) %map%

Getting a canvas from an object

Accepts a map item (of type ItemStack) as an argument, which represents a game map item, and returns a canvas object that can be used for drawing and manipulating the map’s visual content.

[drawing] map (of|from) item %itemstack%

Forced saving of the canvas

save map %map%

Maps are not automatically loaded. To prevent them from disappearing, store the canvases of these maps in global variables.

The addon supports automatic serialization of data associated with canvases.

Painting on canvas

Get the color of a pixel on the canvas

pixel %number%(,[ ]| )%number% of %map%

It does not allow you to change the color of a pixel, use the expression paint over a pixel

Paint over a pixel

Allows you to set a specific color for a pixel based on its coordinates. The first two arguments point to the coordinates on the canvas, the subsequent ones are in RGB or RGBA format, and the last one is the canvas.

draw pixel [at] %number%(,[ ]| )%number% [with colo[u]r] %number%(,[ ]| )%number%(,[ ]| )%number%[(,[ ]| )%-number%] on [map] %map%
set {_map} to new drawing map
draw pixel at 1,1 with color 255,0,0 on map {_map}
# will draw pixel at 1,1 with pure red color

Paint over pixels

Allows you to set a specific color for pixels in the range.
The first four arguments point to the coordinates on the canvas, the next color is in RGB or RGBA format, and the last one is the canvas.

draw pixels (from|between) %number%(,[ ]| )%number% [to] %number%(,[ ]| )%number% [with colo[u]r] %number%(,[ ]| )%number%(,[ ]| )%number%[(,[ ]| )%-number%] on [map] %map%
set {_map} to new drawing map
draw pixels from 10,10 to 50,50 with color 255,0,0 on map {_map}
# will draw pure red square on map

Draw a line

Accepts similar arguments with pixel coloring.

draw line (from|between) %number%(,[ ]| )%number% [to] %number%(,[ ]| )%number% [with colo[u]r] %number%(,[ ]| )%number%(,[ ]| )%number%[(,[ ]| )%-number%] on [map] %map%

Draw a bezier curve

The first four arguments are the points between which the main part of the curve will be. The following four arguments allow you to optionally specify control points for the curve offset. The following arguments are similar to drawing a line or coloring pixels.

draw bezier curve (from|between) %number%(,[ ]| )%number% [to] %number%(,[ ]| )%number% [[with] control points] %number%(,[ ]| )%number% [and] %number%(,[ ]| )%number% [with colo[u]r] %number%(,[ ]| )%number%(,[ ]| )%number%[(,[ ]| )%-number%] on [map] %map%

Draw a circle

The first two arguments are the center of the circle, the next one is the radius of the circle. The other arguments are color and canvas.

draw circle at %number%(,[ ]| )%number% with radius %number% [with colo[u]r] %number%(,[ ]| )%number%(,[ ]| )%number%[(,[ ]| )%-number%] on [map] %map%

Draw an image

The image should be in the images/ folder of the addon. Takes the name of the image file as the first argument.

draw image %string% on [[the] map] %map%

Write text on the map

The first argument is the text to be written, the next two arguments describe the font name and font size.

draw text %string% [at] %number%(,[ ]| )%number% [with font %-string%] [with size %-number%] [with colo[u]r] %number%(,[ ]| )%number%(,[ ]| )%number%[(,[ ]| )%-number%] on [map] %map%

Subsections of Packets

Creating packets

Learning

This site contains a description of the packets used in the Minecraft back-end.
Select the core version on the website on which the server is located and click on the link of this version.
First, we need to find the packet that we need. All packets located in the SERVERBOUND section - packets are sent to the server players in the CLIENTBOUND section - from the server to the player. We are obviously interested in the packets section CLIENTBOUND.
Let’s choose a packet SET CAMERA , since it has not changed since version 1.8.
This packet allows you to set a camera for the player, similar to the camera that occurs when you click on an entity in spectator mode.
We see the following table on the website:

Packet IDStateBound ToField NameField TypeNotes
0x50PlayClientCamera IDVarIntID of the entity to set the client’s camera to.

This table contains the packet number, the moment of gameplay when it can be received, what the packet is linked to, and a description of its contents.
First of all, we need to find out what this packet is called on the server. To do this, we will need the first three fields:

  • id
  • state
  • bound

Getting the packet name

[wrapped] packet name (by|of) id %number% [(and|,)] state %string% [(and|,)] bound %string%

ID on the site is indicated by a number in the hexadecimal, using the module Bitwise we can specify the value as described on the site, or convert the number from the site to the decimal (choose which is more convenient for you).

on load:
  broadcast packet name of id 0x50 and state "play" and bound "client"

After loading script, the name of this packet will be written in the chat - PacketPlayOutCamera.
We won’t need any more code above, it was necessary to find out the name of the packet.
Next, we need to fill the buffer with the data described in the columns Field Name, Field Type, Notes.
We will fill in a new structure - ByteBuf. It is a set of bytes into which bytes can be written and read.

Creating a buffer

The expression below is used to create an empty buffer:

empty buffer
command packet_example:
  trigger:
    set {_buffer} to empty buffer

Filling the buffer with data

The following expressions are used to write to the buffer:

write bytes %bytebuf% to %bytebuf%
write bool[ean] %boolean% to %bytebuf%
write uuid %string% to %bytebuf%
write string %string% to %bytebuf%
write utf[-| ]8 %string% to %bytebuf%
write position %vector% to %bytebuf%
write position %location% to %bytebuf%
write [unsigned] byte %number% to %bytebuf%
write [unsigned] short %number% to %bytebuf%
write float %number% to %bytebuf%
write double %number% to %bytebuf%
write int[eger] %number% to %bytebuf%
write long %number% to %bytebuf%
write angle %number% to %bytebuf%
write var[iable][ ]int[eger] %number% to %bytebuf%
write var[iable][ ]long %number% to %bytebuf%

Each expression provides a specific type, described in the section Data type on wiki .
Some complex types described on the site can be made up of simple ones, so they are missing in expressions.
Packet PacketPlayOutCamera accepts a field with the type VarInt and a value equal to the entity ID.
To get the identifier use the following expression .
From the table, we know that you need to write this identifier with the type VarInt. Let’s use the necessary expression:

command packet_example:
  trigger:
    set {_buffer} to empty buffer
    set {_entity} to target entity of player
    set {_id} to entity id of {_entity}
    write varint {_id} to {_buffer}

Since the table no longer contains data, we can create a packet from the buffer by its name.

Write index

Each write to the buffer shifts its Writer index, which is the number of bytes written inside the buffer.
Writer index you can find out or change it using the following expression:

writer index of %bytebuf%
%bytebuf%'s writer index

Creating a packet from a buffer

The expression below allows you to create a packet based on the packet name and the filled buffer for subsequent sending.

[create] packet %string% (from|of|with) %bytebuf%
command packet_example:
  trigger:
    set {_buffer} to empty buffer
    set {_entity} to target entity of player
    set {_id} to entity id of {_entity}
    write varint {_id} to {_buffer}
    set {_packet} to create packet "PacketPlayOutCamera" with {_buffer}

We have created our first packet, it remains only to send it to the player.

Sending packets

The following expression is used to send packets:

send packet %packets% to %players%

The expressions below allow you to send a packet without calling an event on packet

send packet %packets%  without [(trigger|call)[ing]] [the] event to %players%
send packet %packets% to %players%  without [(trigger|call)[ing]] [the] event
command /entitycam:
  trigger:
    set {_buffer} to empty buffer
    set {_entity} to target entity of player
    set {_id} to entity id of {_entity}
    write varint {_id} to {_buffer}
    set {_packet} to create packet "PacketPlayOutCamera" with {_buffer}
    send packet {_packet} to player

To check the operability of the code above, aim your cursor at any entity, and then send the command /entitycam.
After executing the command, you will be looking from the entity’s face, even if you are not in spectator mode.

This way you can create any packet by following the steps described above.

Packet handling

The event of receiving or sending a packet.

This event allows you to trigger code when a packet is received (Client -> Server) or sent (Server -> Client).

on packet:
on packet %packet name%:


The event can be canceled. In this case, the packet will not be received or sent (respectively).

This event has built-in expressions.

  • event-packet - to receive the packet
  • event-player - to get a player

event-packet can be replaced with set event-packet to %packet%, provided that no execution delay was used.

on packet PacketPlayOutOpenSignEditor:
  broadcast "%event-player%"
  broadcast "%event-packet%"
  cancel event

In this example, the player’s username and the packet name are displayed in the chat. And then cancel sending this event to the player.
The packet itself forces the player to open the text editing window of the plate.

Getting a buffer from a packet

After receiving the buffer from the packet, we can read the fields indicated on The Minecraft Wiki

buffer (of|from) %packet%
%packet%'s buffer

Reading the buffer

To get values from the buffer, the following expressions exist, similar to writing to the buffer

read bool[ean] from %bytebuf%
read uuid from %bytebuf%
read string from %bytebuf%
read position from %bytebuf%
read [unsigned] byte from %bytebuf%
read [unsigned] short from %bytebuf%
read float from %bytebuf%
read double from %bytebuf%
read int[eger] from %bytebuf%
read long from %bytebuf%
read angle from %bytebuf%
read var[iable][ ]int[eger] from %bytebuf%
read var[iable][ ]long from %bytebuf%
read utf[(-| )]8 [with [len[gth]]] %number% from %bytebuf%

To read utf-8 you must also specify the length of the text in bytes

Reading occurs in the same order as writing a packet, provided that the packet was not created by you.
If you created a packet and want to read it, then move its reader index to position zero.

In this tutorial, we will use the Open Sign Editor packet. Let’s see how we can read and use it.

Packet IDStateBound ToField NameField TypeNotes
0x32PlayClientLocationPosition
Is Front TextBooleanWhether the opened editor is for the front or on the back of the sign

Now, let’s use the information from this table to create the packet handling code.

First, let’s find the %packet name%.
To get the packet name, we can use the packet name finder ( See Packet Creation )

Second, we need to get the buffer from the packet.
To get the buffer, we can use the expression buffer (of|from) %packet% ( See Getting a buffer from a packet )

Third, let’s read the fields from the buffer.
To read a field, we can use the expression read %field type% from %buffer% ( See Reading the buffer )

Fourth, let’s use the information from the packet.
In this example, we will display the coordinates of the opened sign in the chat.

on packet PacketPlayOutOpenSignEditor:
  set {_buffer} to buffer from event-packet
  set {_position} to read position from {_buffer}
  set {_isFrontText} to read boolean from {_buffer}
  broadcast "%{_position}%"
  cancel event

And that’s it!
We have successfully read the packet and used it.

Tutorial written by @GuavaDealer

Reader index

Each reading of the buffer shifts its Reader index, this is the number of bytes read inside the buffer.
Reader index you can find out or change it using the following expression:

reader index of %bytebuf%
%bytebuf%'s reader index

Disabling or enabling packet handling

You can enable or disable handling of incoming or outgoing packets per player using the following expression.

[(handl(e|ing))|(listen[ing] [of])] (in|out)coming packets of %player%
%player%'s [(handl(e|ing))|(listen[ing] [of])] (in|out)coming packets
on join:
  set handling of incoming packets of player to false

Packet Extras

Get an Entity’s packet ID

This is different from a UUID, an entity ID is used to identify the entity in packets.
As such, they return different values.

entity id of %entity%
%entity%'s entity id

Manipulate a player’s skin value

skin value of %player%
%player%'s skin value

Manipulate a player’s skin signature

skin signature of %player%
%player%'s skin signature

Clear player’s skin signature and value

delete skin properties of %player%
delete %player%'s skin properties

Get text bytes

Returns a list of bytes.
It is also possible to specify the required encoding. Default is UTF-8

bytes of %string% [with charset %string%]
%string%'s bytes [with charset %string%]

Create Bundle packet

This is a packet that allows you to create a sequence of packets and send them to the client at once, which provides greater speed and stability.
If you are sending many packets at once, put them in a Bundle.

bundle packet (from|of|with) %packets%

PERMISSIONS

Force a player to execute a command with operator rights

This allows you to execute a command as an operator, even if the player does not have operator rights.

[execute] [the] command %strings% [by %-commandsenders%] as op
[execute] [the] %commandsenders% command %strings% as op
(let|make) %commandsenders% execute [[the] command] %strings% as op

User permission management

This section explains how to manage and modify player permissions programmatically.

%player%'s perm[ission][s]
perm[ission][s] of %player%

If this confuses you, you can use the following tutorial to understand how to use it.

command /permissionTest:
    permission: example.permission.test # we can set a permission for the command here instead of checking it in the code
    trigger:
        # Check if the player has a specific permission
        # This permission check is used for checking if the sender can execute the command
        # This check is redundant as it can be set directly in the command itself ( as seen above)
        if player does not have permission "example.permission.test":
            send "You don't have the permission `example.permission.test`!"
            stop

        # Add permissions
        add "example.permission.A" to player's perms
        add "example.permission.B" to player's perms

        # Display the player's permissions after adding permissions
        broadcast "%player's permissions%"

        # Remove permissions
        remove "example.permission.A" from player's permissions
        remove "example.permission.B" from player's permissions

        # Display the player's permissions after removing permissions
        broadcast "%player's permissions%"

This tutorial demonstrates how to check, add, and remove player permissions programmatically using a command.
In this example, the command /permissionTest checks if the player has a specific permission. It then adds and removes permissions from the player’s permission list and broadcasts the updated permissions to all players.

Let’s go through the code step by step:

First, we check if the player has the example.permission.test permission
We are utilizing the player does not have permission expression, which evaluates whether the player lacks a specific permission.

Second, we send a message to the player if they lack the permission.
If the player does not have the permission, we send a message informing them and use the stop keyword to halt further execution of the command.
This ensures that no subsequent actions in the command are performed.

Third, we add two permissions to the player’s permissions list.
The add expression is used to add permissions to the player’s permission list.
In this case, we add example.permission.A and example.permission.B to the player’s permissions.

Fourth, we display the player’s permissions after adding the permissions.
This outputs the player’s permissions to all players in the server.
The output will show the player’s permissions, including the newly added permissions.

Fifth, we remove the two permissions from the player’s permissions.
The remove expression is used to remove permissions from the player’s permission list.
In this case, we remove example.permission.A and example.permission.B from the player’s permissions.

Finally, we display the player’s permissions after removing the permissions.
This outputs the player’s permissions to all players in the server.
The output will show the player’s permissions, notice how the player is no longer granted the newly removed permissions.

This example demonstrates how to manage player permissions programmatically using the add and remove expressions.
You can use these expressions to check, add, and remove permissions as needed in your Skript code.

Tutorial written by @GuavaDealer

Subsections of Requests

EXPRESSIONS

Request header

Creates a new request header as a key:value pair, where the key represents the header name and the value represents its content.

request (header|property) %string% %string%

Request Header Key

Retrieves the key (name) of a request header from a key:value pair, allowing you to identify the header’s purpose.

%request property%'s key
key of %request property%

Request Header Value

Retrieves the value of a request header from a key:value pair, allowing you to access the header’s content.

%request property%'s value
value of %request property%

EFFECTS

Asynchronous HTTP/S request

Executes a request with the specified method to the specified site using the specified headers and the specified request body. Returns the code and the body of the response.

[async[hronously]] request [%string%] to [url] %string% [with header[s] %request properties%] [(and|with) body %string%] [and store [[the] (body|result) in %object%] [and] [code in %object%]]
async request "GET" to url "https://crewpvp.xyz" and store the result in {_data} and code in {_code}

An asynchronous request cannot be used in functions where a value is returned. The result of an asynchronous request in this case will be <none>.

function asyncRequest() :: string:
    async request "GET" to url "https://crewpvp.xyz" and store the result in {_data} and code in {_code}
    return "{_data};{_code}"

command /asyncRequest:
    trigger:
        set {_result} to asyncRequest()
        send "{_result}" to player

Running the command /asyncRequest will return <none> instead of the expected result.

Synchronous HTTP/S request

Executes a request with the specified method to the specified site using the specified headers and the specified request body. Unlike asynchronous requests, this operation blocks the main thread until the response is received, which can lead to application unresponsiveness. Use synchronous requests only when blocking behavior is acceptable or necessary.

sync[hronously] request [%string%] to [url] %string% [with header[s] %request properties%] [(and|with) body %string%] [and store [[the] (body|result) in %object%] [and] [code in %object%]]

Blocking the main thread for the duration of the request can cause application unresponsiveness. Use this option wisely to avoid negatively impacting the user experience.

RUNTIME

This module allows you to get information about the load and some technical information about the equipment.

Run the command in the operating system

Executes a command in the console/terminal of the operating system.

[execute] [the] system command %strings%
(let|make) system execute [[the] command] %strings%

The amount of allocated RAM in bytes

RAM (Server)
[skcrew] max memory of server
[skcrew] [the] server['s] max memory
RAM (System)
[skcrew] max memory of system
[skcrew] [the] system['s] max memory
SWAP RAM (System)
[skcrew] max swap memory of system
[skcrew] [the] system['s] max swap memory
The amount of used RAM in bytes
RAM (Server)
[skcrew] used memory of server
[skcrew] [the] server['s] used memory
RAM (System)
[skcrew] used memory of system
[skcrew] [the] system['s] used memory
SWAP RAM (System)
[skcrew] used swap memory of system
[skcrew] [the] system['s] used swap memory

Server uptime (Server lifetime)

[the] server['s] uptime
[the] uptime of server

Processor information

Cores
processor['s] cores amount
[amount of] processor cores
Threads
processor['s] threads amount
[amount of] processor threads
Name
processor['s] name
name of processor

The load factor of the server by this process

[the] process['s] [average] load
[average] load of process

Server load factor

[the] (system|cpu)['s] [average] load
[average] load of (system|cpu)

SOCKETS

This module allows servers under the control of a proxy server to exchange information via sockets.

For the module to work, you need to install Skcrew on a proxy server ( Velocity or BungeeCord ).

Velocity is the recommended choice for a proxy server. BungeeCord is supported; however, Velocity is the preferred choice.

BungeeCord is supported but it is not recommended.

To configure the proxy server:

  • For Velocity , edit the velocity.toml file and specify the port for opening the server socket.
  • For BungeeCord , edit the config.yml file and specify the port for opening the server socket.

On the back-end server, specify the address of the proxy server and the port of the open server socket.

Configuration on a proxy server

socket-server-port: 1337

Configuration on a back-end server

sockets:
  enabled: false
  server-address: "127.0.0.1"
  server-port: 1337
  client-autoreconnect-time: 5

client-autoreconnect-time - describes the time after which the game server will try to reconnect if the proxy server is disabled.

EXPRESSIONS
CONDITIONS
EFFECTS
EVENTS
SIGNALS
WEB API

Subsections of Sockets

EXPRESSIONS

Get the current server

Returns the current (Back-end) server

(current|this) server

Get the server by name

Returns the server by its proxy configuration name.
Will return <none> if the server is not found.

server %string%

Get the name of a server

server[ ]name of %server%
%server%'s server[ ]name

Get a list of servers

The expression below returns a list of all servers defined in the proxy configuration.

[all] servers

Get a list of only online servers (Must be connected to the socket server)

[all] online servers

Get players from the server

Returns a list of players in the form of online players.

players (from|of|on) %servers%
%servers%'s players

Get a player on a proxy server

Accepts the player’s username or UUID, returns the online player, or <none> if the player is not online

network[ ]player %string%

The server player is automatically converted to OfflinePlayer if used in any expressions if necessary.

Get the player’s server

server of %networkplayer%
%networkplayer%'s server

Network Variable

Variable that is synchronized with all servers connected to the proxy. works as a regular variable in Skript

(network|proxy) variable %objects%

CONDITIONS

Check if a server is online

%servers% is (online|connected)
%servers% is(n't| not) (online|connected)

Check if a player is online

Allows you to change the player’s server if it is located on a server that is connected to a proxy server

%offlineplayers% is ([online ]on|connected to) proxy
%offlineplayers% (does|is)(n't| not) ([online ]on|connected to) proxy

EFFECTS

Kick a player from a proxy server

Allows you to specify the reason. The reason may be plain text, or an AdventureAPI component ( Velocity ) or ChatComponentAPI ( BungeeCord ) in JSON format.

kick %offlineplayers% from proxy [(with reason|by reason of|because [of]|on account of|due to) %string%]
kick %offlineplayers% from proxy with reason "Violation of rules"

Move the player to the server

Allows you to change the player’s server if it is located on a server that is connected to a proxy server

switch %offlineplayers% to %server%

EVENTS

Player has connected to the proxy server

Triggered when a player connects to the proxy but has not yet joined any server.

on player (join|connect)[(ed|s)] [to] proxy [server]

This event provides built-in data, allowing you to retrieve the connected player as an OfflinePlayer using event-player.

Player disconnects from the proxy server

on player (leave|disconnect)[(ed|s)] [from] proxy [server]

This event provides built-in data, allowing you to retrieve the connected player as an OfflinePlayer using event-player.

Current server connects to the proxy

Called after the server has been connected to the proxy.

on connect(ed|s) [to] proxy [server]
on proxy connect

Current server disconnects from the proxy

Called after the server has disconnected from the proxy.

on disconnect(ed|s) [from] proxy [server]
on proxy disconnect

Attempt to reconnect to the proxy

Called when the server attempts to reconnect to the proxy.

on reconnect(ing|s) [to] proxy [server]
on proxy reconnect

The server has connected to the proxy

Called after any server has connected to the proxy

on server connect(ed|s) [to] proxy [server]

The event has built-in data, using the event-server you can get a connected server

The server was disconnected from the proxy

Called after any server has disconnected from the proxy

on server disconnect(ed|s) [from] proxy [server]

The event has embedded data, using the event-server you can get a disconnected server

The player has connected to the back-end server

It is called after the player is connected to the back-end server, which is connected to the proxy.

on player (join|connect)[(ed|s)] [to] (proxied|network) server

The expression below allows you to track connections only to a specific server by its name.

on player (join|connect)[(ed|s)] [to] (proxied|network) server %string%

The event contains embedded data, such as event-server, which allows you to get the server the player is connected to, and event-player, which allows you to get the player in the form of an OfflinePlayer.

The player disconnected from the back-end server

It is called after the player disconnects from the back-end server that is connected to the proxy.

on player (leave|disconnect[e])[(d|s)] [from] (proxied|network) server

The expression below allows you to track disconnections only from a specific server by its name.

on player (leave|disconnect[e])[(d|s)] [from] (proxied|network) server %string%

The event has built-in data, using the event-server you can get the server of the player from which they left, and using the event-player you can get the player in the form of an OfflinePlayer

SIGNALS

Signals allow you to transfer information across servers.
Signals are better known as Plugin Messages.

Create a signal

A signal is formatted as key : values, which allows you to transfer any data that can be serialized.

signal [(with key|keyed)|(with name|named)] %string% (and|with) [data] %objects%
set {_signal} to signal named "broadcast" with data "Hello world!","Second data value!" and "Hey, look at me! I'm the third value!"

Get a signal’s key.

(key|signal name) of %signal%
%signal%'s (signal name|key)

Get a signal’s data

Returns a list of objects

data of %signal%
%signal%'s data

Send a signal

Allows you to send a signal to any connected server

Note: Only servers that are online will be able to receive the signal.

send signal %signals% to %servers%
set {_signal} to signal named "broadcast" with data "Hello world!","Ooo, spooky!", "Dark magic!"
send signal {_signal} to all servers

Listen for a signal event

It also allows you to track signals by key.

signal [(with key|keyed) %string%]

The event has built-in data, using the event-signal you can receive the incoming signal.

on join:
  set {_signal} to signal named "broadcast" with data "Welcome back %player%"
  send signal {_signal} to all servers

on signal with key "broadcast":
  broadcast (data of event-signal)

WEB API

Web API allows you to get information from servers, as well as send signals from outside.
Make sure that the web server is enabled in the Skcrew settings of your proxy server (see sockets setup ).

web-server-enabled: true
web-server-port: 1338
web-server-user: admin
web-server-password: admin

Here you can also configure the web server port and its authorization data to access the API.
Authorization is performed by passing the username and password to base64 in the request header.

Create a base64 authentication string by visiting base64encode.org and encoding the following format in the encoding field:

username:password

This format will help you generate a properly formatted base64 string.

Now, you can use the following header (replace YOUR-BASE64-AUTHENTICATION-STRING with the base64 authentication string):

Authorization: Basic YOUR-BASE64-AUTHENTICATION-STRING

Examples

In the following examples, we used “admin:admin” as the base64 authentication string.
Eg. the username is “admin” and the password is “admin”.

Available routes for requests.

GET    /players

Allows you to get a list of all players and the name of the server they are on.
Possible parameters:

  • server:string - allows you to get players from a specific server
curl localhost:1338/players -H "Authorization: Basic YWRtaW46YWRtaW4="
{
  "data": [
    {
      "name": "Lotzy",
      "uuid": "a0970e26-b9f4-3f73-bd06-ede16c390d34",
      "join_date": 1706008310,
      "time_played": 1089,
      "server_name": "lobby"
    }
  ]
}

GET    /players/{UUID/USERNAME}

Allows you to get a player, if they are online, by their username or UUID. As well as the server on which they are located.

curl localhost:1338/players/Lotzy -H "Authorization: Basic YWRtaW46YWRtaW4="
{
  "data": {
    "name": "Lotzy",
    "uuid": "a0970e26-b9f4-3f73-bd06-ede16c390d34",
    "join_date": 1706008310,
    "time_played": 2335,
    "server_name": "lobby",
    "server": {
      "name": "lobby",
      "address": "127.0.0.1",
      "port": 25565,
      "hostname": "127.0.0.1",
      "online": true,
      "connection_date": 1706008017,
      "uptime": 2628,
      "players_count": 1,
      "players": [
        {
          "name": "Lotzy",
          "uuid": "a0970e26-b9f4-3f73-bd06-ede16c390d34",
          "join_date": 1706008310,
          "time_played": 2335,
          "server_name": "lobby"
        }
      ]
    }
  }
}

GET  POST    /players/{UUID/USERNAME}/kick

Allows you to kick a player from a proxy server, by their username or UUID.
When using a POST request, you can specify the reason for the kick. The reason can be specified either in plain text, an AdventureAPI component ( Velocity ) or in ChatComponentAPI ( BungeeCord ) in JSON format.

curl localhost:1338/players/Lotzy/kick -X POST -H "Authorization: Basic YWRtaW46YWRtaW4=" -H "Content-Type: application/json" -d '"GET OUT!"'
{
  "data": "Player Lotzy kicked"
}

GET    /players/{UUID/USERNAME}/connect/{SERVER}

Allows you to move a player to another server, by their username or UUID.\

curl localhost:1338/players/Lotzy/connect/lobby -H "Authorization: Basic YWRtaW46YWRtaW4="
{
  "data": "Player Lotzy connected to server lobby"
}

GET    /servers

Get a list of all servers and players on them.
Possible parameters:

  • online:boolean - allows you to get only those servers that are online
curl localhost:1338/servers?online=true -H "Authorization: Basic YWRtaW46YWRtaW4="
{
  "data": [
    {
      "name": "lobby",
      "address": "127.0.0.1",
      "port": 25565,
      "hostname": "127.0.0.1",
      "online": true,
      "connection_date": 1706008017,
      "uptime": 2132,
      "players_count": 1,
      "players": [
        {
          "name": "Lotzy",
          "uuid": "a0970e26-b9f4-3f73-bd06-ede16c390d34",
          "join_date": 1706008310,
          "time_played": 1839,
          "server_name": "lobby"
        }
      ]
    }
  ]
}

POST    /servers/{SERVER}/signal

Allows you to send a signal to the connected server.
The signal itself is transmitted in the request body.

curl localhost:1338/servers/lobby/signal -X POST -H "Authorization: Basic YWRtaW46YWRtaW4=" -H "Content-Type: application/json" -d "{'signals':[{'key':'broadcast','data':['Hello world!']}]}"
{
  "data": {
    "response": "Signals successfully sended to servers"
  }
}

POST    /signal

Allows you to send a signal to the connected servers.
The signal itself and the list of servers are transmitted in the request body.

curl localhost:1338/servers/lobby/signal -X POST -H "Authorization: Basic YWRtaW46YWRtaW4=" -H "Content-Type: application/json" -d "{'servers':['lobby'],'signals':[{'key':'broadcast','data':['Hello world!']}]}"
{
  "data": {
    "response": "Signals successfully sended to servers"
  }
}

You can see an example of implementing API access in Python at this link

SQL

This module allows you to connect to the DBMS and make synchronous and/or asynchronous requests.

Special thanks to btk5h (Bryan Terce), FranKusmiruk, Govindas, TPGamesNL for their contributions to the Skript-db addon.

Part of the code and the idea was borrowed from here.

Connecting to a DBMS

Initializes the connection to the DBMS and returns this connection. Returns an object of the type datasource (com.zaxxer.hikari.HikariDataSource class). You can also optionally specify a driver for interaction with the DBMS.
If the driver is not specified, the addon will try to select a driver from the list of available ones (mysql, mssql, oraclesql, sqllite, postgres)

[the] data(base|[ ]source) [(of|at)] %string% [with [a] [max[imum]] [connection] life[ ]time of %timespan%] [(with|and) driver [class] [name] %-string%]
set {_database} to database of "mysql://127.0.0.1:3306/luckperms?user=ADMIN&password=IAMADMIN&useSSL=true"

In this example we are connecting to a local MySQL database.

  • The IP address is 127.0.0.1
  • The port number is 3306
  • The database name is luckperms
  • The username is ADMIN
  • The password is IAMADMIN
  • SSL is enabled (Secure Connection)
set {_database} to database of "mysql://IPADDRESS:PORT/DATABASENAME?user=USERNAME&password=PASSWORD&useSSL=false"

Replace the values with your own

  • IPADDRESS
    • The database server’s IP address
  • PORT
    • The database server’s port
  • DATABASENAME
    • The name of the database
  • USERNAME
    • The username to connect to the database
  • PASSWORD
    • The password to connect to the database

Asynchronous request to the DBMS

[async[hronously]] execute %string% [with (data|(param[eter][s])) %objects%] (in|on) %datasource% [and store [[the] (output|result)[s]] (to|in) [the] [var[iable]] %objects%]

The first parameter - is the query being executed.
The second parameter - is the insertion of values for escaping. The first character is ? will be replaced by the first value from the passed list in the second argument, the second ? to the second from the list, etc. For example:

execute "select * from ? where name=?" with "books","worldAtWar" in {_database}

The first ? will be replaced with books before executing the request, and the second one with ‘worldAtWar’.

Use value escaping for any queries where user input is used to avoid SQL-injection


The third parameter - connecting to a DBMS, an object of type datasource from a previous expression.
The last parameter - where the query result will be placed, you must specify the list variable. After the query, the column names will become indexes of this list, the column values will be stored in a new sub-list with the column name.

For example, we have the following table:

id (INT)name (VARCHAR)age (INT)
1Lotzy22
2w0w019


When executing the code:

execute "select * from table" in {_database} and store the result in {_output::*}

The list {_output::*} will look like this:

{_output::id::1} = 1
{_output::name::1} = "Lotzy"
{_output::age::1} = 22
{_output::id::2} = 2
{_output::name::2} = "w0w0"
{_output::age::2} = 19
{_output::*} = "id", "name" and "age"

An asynchronous request cannot be used in functions where a value is returned. The result of an asynchronous request will be <none>

Synchronous request to the DBMS

sync[hronously] execute %string% [with (data|(param[eter][s])) %objects%] (in|on) %datasource% [and store [[the] (output|result)[s]] (to|in) [the] [var[iable]] %objects%]

Block the main thread for the duration of the request, use wisely.

STRING UTILS

Check that the text matches the regular expression

%string% [(does|is)][n't| not] regex match(es|ed) %string%
if "1361" is regex matches "1..1":
  broadcast "Matches"

Find groups by regular expression

regex group[s] %integer% of %string% matched to %string%
set {_group::*} to regex group 1 of "123123123123" matched to "123"

Regular expression substitution

regex replace %string% with %string% in %string%
set {_text} to regex replace "3.*" with "" in "123123123123"

Split text by regular expression

regex split %string% at %string%
set {_text::*} to regex split "123123123123" at ".3"

Mirror a string

(reverse[d]|backward(s|ed)) [(string|text)] %string%
set {_text} to reversed "321"

Split a string every at instance of the character N

%string% split [(by|at)] every %integer% (symbol|char[acter])[s]
split %string% [(by|at)] every %integer% (symbol|char[acter])[s]
set {_text::*} to "123123123123" split every 3 symbols

VIAVERSION

This module allows you to interact with the ViaVersion plugin.

The ViaVersion plugin is required for this module to work

Get a player’s client version

returns as a string

[the] version of %player%
%player%'s version

Get a player’s protocol version

returns as an integer

[the] protocol of %player%
%player%'s protocol

Subsections of World

EFFECTS

Load a world

Loads the world by its name. The world must be located in the root directory of the server.

load world %string%

Unload a world

Unload the world. It also allows you not to save changes when uploading.

unload [world] %world% [without save]

Load a chunk

Additionally, it allows you not to generate a chunk if it hasn’t been generated yet.

load %chunk% [without gen[erate]]

Unload a chunk

Unload the chunk. It also allows you not to save changes when uploading.

unload [chunk] %chunk% [without save]

Create a world

create world %-string%[ with ][[,] dimension %-worlddimension%][[,] seed %-string%][[,] type %-worldtype%][[,] generator %-string%][[,] structures %-boolean%]
create world "lake_of_lotzy" with dimension normal, type flat

Delete a world

delete world %world/string%

Create a copy of a world

(copy|duplicate) world %string% [(with|using)] name[d] %string%

EXPRESSIONS

Get the main server world

Returns the main world of the server, which is required for the server to operate.

main[ ]world

Get a chunk by its coordinates

In this expression, not the coordinates of the blocks are used, but the coordinates of the chunk.
To get the coordinates of the chunk, the X and Z coordinates are divided by 16.

chunk [at] %number%[ ],[ ]%number% (in|at) %world%

Get all entities inside a chunk

entit(y|ies) (of|in) %chunk%
%chunk%'s entit(y|ies)

Get all of the loaded chunks in a world

[all [[of] the]] loaded chunks (in|at|of) %world%
%world%'s [all [[of] the]] loaded chunks

Constant loading of the chunk

Not supported on versions lower than 1.13.1

force load[ed] of %chunk%
%chunk%'s force load[ed]

World’s border center

[world] border center of %world%
%world%'s [world] border center

World’s border size

When changing the size, it is possible to add a %timespan% for how long the worldborder should take in order to change its size.

[world[ ]]border size of %world% [for %-timespan%]
%world%'s [world[ ]]border size [for %-timespan%]
[the] size of %world%'s [world[ ]]border [for %-timespan%]

Conditions

Check if a chunk is loaded

%chunk% [(does|is)][(n't| not)] load[ed]

Check if a world exists

world %string% [(does|is)][(n't| not)] (exist[s]|available)

TYPES

World’s dimension type

Affects certain visual aspects of the world, such as the skybox, the sun, and the clouds.

world[ ]dimension
normal, nether, the_end

World’s generator type

world[ ]type
flat, large_biomes, normal, amplified, customized, debug_all_blocks, debug_geom

Subsections of Other

EVENTS

Inventory drag event

An event triggered when a player presses the mouse button to distribute items in the inventory

on inventory drag

EFFECTS

Give or drop

Gives items to a player, if their inventory is full, drops them at the player’s location instead.

give or drop %itemtypes/experiences% to %players%

Damage an entity while accounting for armor and potion effects

This effect allows you to damage an entity while taking into account their armor and potion effects.
You can also specify the type or cause of the damage.

damage %entity% with armor[ and potions] by %number% [heart[s]] [using [(type|cause)] %-damagetypecategory%]

EXPRESSIONS

When handling an Inventory Drag Event, it is often useful to identify the new items added to the inventory for further processing or validation.

Returns a list of items that have been added

new items
added items

This section explains how to retrieve the slot numbers that were affected during an Inventory Drag Event.
Returns the slot numbers that have been changed in the same order as it returns the expression for things.

changed slot[s]
event[-]slots

TYPES

Damage category

(damage[ ]type[ ])?categor(y|ies)
environmental, projectile, explosion, fire, fall
(Environmental - All type of damage)
(Fire - Fire, lava, and blaze fireballs)
(Explosion - Explosions)
(Projectile - Arrows, thrown tridents, ghast and blaze fireballs)
(Fall - Fall damage (including ender pearls))